I will try to explain how to properly disassemble any normal desktop computer of todays age.
First and basic thing you will have to do is unplug all the cables from a computer case. Now open the case with unscrewing the two or more screws on the back of the case, depending from the case brand.
Slide open the case cover you just unscrewed. Next we will remove all the cables from the Hard Disk Drive (HDD) and Optical Drives (on older computers even some other things connected this way).

Computer that is used in this presentation is relatively old, so you will encounter SATA cables and connectors instead of these PATA ones.
Since we are at it, we will disconnect 20+4pin and 4pin connectors from the motherboard.

Easy Weight Loss
If you have additional fans connected to the Power Supply Unit (PSU), you can disconnect them too.
Removing the HDD and Optical Drives consists of removing usualy two screws from each side of them and sliding them towards the motherboard.


Since everything is disconnected from the PSU, we will remove it.
 You can remove it by unscrewing the 4 screws at the back of the computer case.

Next we will remove all the RAM modules from the slots.

Removing the processors fan can be relatively tricky, but easy when you get a hang of it. Intel usually puts two litlle levers instead of screws on newer fans. But in most cases it just consists from removing 4 screws.
Also, disconnect the fans power cable from the motherboard.

Now to remove the cooler.
WARNING - DO NOT REMOVE THE COOLER IF YOU DON'T HAVE ANY THERMAL PASTE TO REPLACE ON IT.
Remove the cooler by pressing the lever that keeps it locked from one side of the cooler (usually top or bottom side).

Notice that there is thermal paste left on the CPU and the cooler. Remove it with tissues etc. CPU is removed by lifting the litlle lever on its side and pulling it up.

Remove the graphic card by pulling or pressing the hinge at its bottom, depending on the motheboard model.

Also remove all aditional PCI cards like sound card, TV card, etc.
Disconnect the front panel connectors from the motherboard (it would be smart to draw the scheme how they were connected for future use).

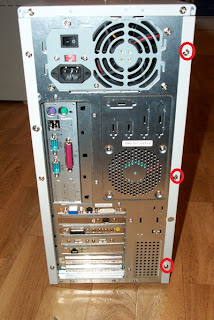
For the final touch remove the screws marked red in previous picture, and voila - you dissasembled your deskop PC completely.
First and basic thing you will have to do is unplug all the cables from a computer case. Now open the case with unscrewing the two or more screws on the back of the case, depending from the case brand.

Slide open the case cover you just unscrewed. Next we will remove all the cables from the Hard Disk Drive (HDD) and Optical Drives (on older computers even some other things connected this way).

Computer that is used in this presentation is relatively old, so you will encounter SATA cables and connectors instead of these PATA ones.
Since we are at it, we will disconnect 20+4pin and 4pin connectors from the motherboard.

Easy Weight Loss
If you have additional fans connected to the Power Supply Unit (PSU), you can disconnect them too.
Removing the HDD and Optical Drives consists of removing usualy two screws from each side of them and sliding them towards the motherboard.


Since everything is disconnected from the PSU, we will remove it.


Next we will remove all the RAM modules from the slots.

Removing the processors fan can be relatively tricky, but easy when you get a hang of it. Intel usually puts two litlle levers instead of screws on newer fans. But in most cases it just consists from removing 4 screws.
Also, disconnect the fans power cable from the motherboard.

Now to remove the cooler.
WARNING - DO NOT REMOVE THE COOLER IF YOU DON'T HAVE ANY THERMAL PASTE TO REPLACE ON IT.
Remove the cooler by pressing the lever that keeps it locked from one side of the cooler (usually top or bottom side).

Notice that there is thermal paste left on the CPU and the cooler. Remove it with tissues etc. CPU is removed by lifting the litlle lever on its side and pulling it up.

Remove the graphic card by pulling or pressing the hinge at its bottom, depending on the motheboard model.

Also remove all aditional PCI cards like sound card, TV card, etc.
Disconnect the front panel connectors from the motherboard (it would be smart to draw the scheme how they were connected for future use).

For the final touch remove the screws marked red in previous picture, and voila - you dissasembled your deskop PC completely.
Нема коментара:
Постави коментар